Rascular’s Helm product is an ideal way to control RouteMaster. Here’s how you set up a Helm panel to control a physical router through RouteMaster.
Create a Helm panel like this

In this example we’ll use a Quartz / Evertz router controlled by a RouterBus control, but it could easily be any supported client router protocol.
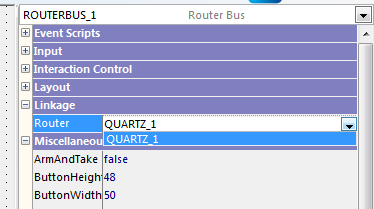
Router Bus settings
All you need to do is point the control at the router.
Router settings

Here are the important settings:
- Connection – IP should be the IP of the RouteMaster PC (in this case we are running on the same machine so we’re using the loopback IP).
- Connection – Port should be set to the default port for the type of router. RouteMaster assigns a specific port to each protocol.
- Router Config – set up the correct size and number of levels for RouteMaster.
- Use Router Names – RouteMaster lets you define Source and Destination names even when the router doesn’t support them. With this setting Helm can read these names and display them on the buttons.
Make sure RouteMaster is running

The Run button should be lit red, and the Clients section on the left should be displayed. If it isn’t click the Run button.
Now run the Helm panel we just created

Click the buttons to change sources.
What happens in the RouteMaster window…

- In the Clients area you can see one Quartz client connected and if you click the chevron to expand the window you can see its IP address.
- As you click on the router bus buttons in the Helm panel you can see the input change in RouteMaster
In our example we’ve used a Dummy Router in RouteMaster but in your system it could be controlling any of our supported router types.