ClockWork is a router control panel combined with a built-in scheduling system that lets you execute router takes at specific times of day. A kind of hands-free router control for busy operators. This document tells you how to install, configure and use ClockWork.
System requirements
ClockWork can be installed be installed on any normal Windows PC. It is not a “demanding” application in terms of memory, processor or graphics. We recommend Windows 10 but ClockWork can be used on earlier Windows version back to Windows 7.
Installation
The software is delivered as a standard Windows installer. Just copy the install file to your hard drive and double click to begin the installation. You will be guided through the process by the wizard dialog in the usual way for Windows applications.
The installer installs Helm Runtime and the ClockWork panel file on your computer. After installation ClockWork is added to your Start menu for easy launching. Now check Launch ClockWork to run ClockWork and begin the process of configuration.

Adding router licences
All Rascular product authorisation is done using .lice files. These are small data files that add licences for specific router types and / or product features. To install the .lice file you have received from Rascular simply place the file in the RouteTimer folder in C:\Program Files (x86)\Rascular\ClockWork and restart the ClockWork application.

The ClockWork screen
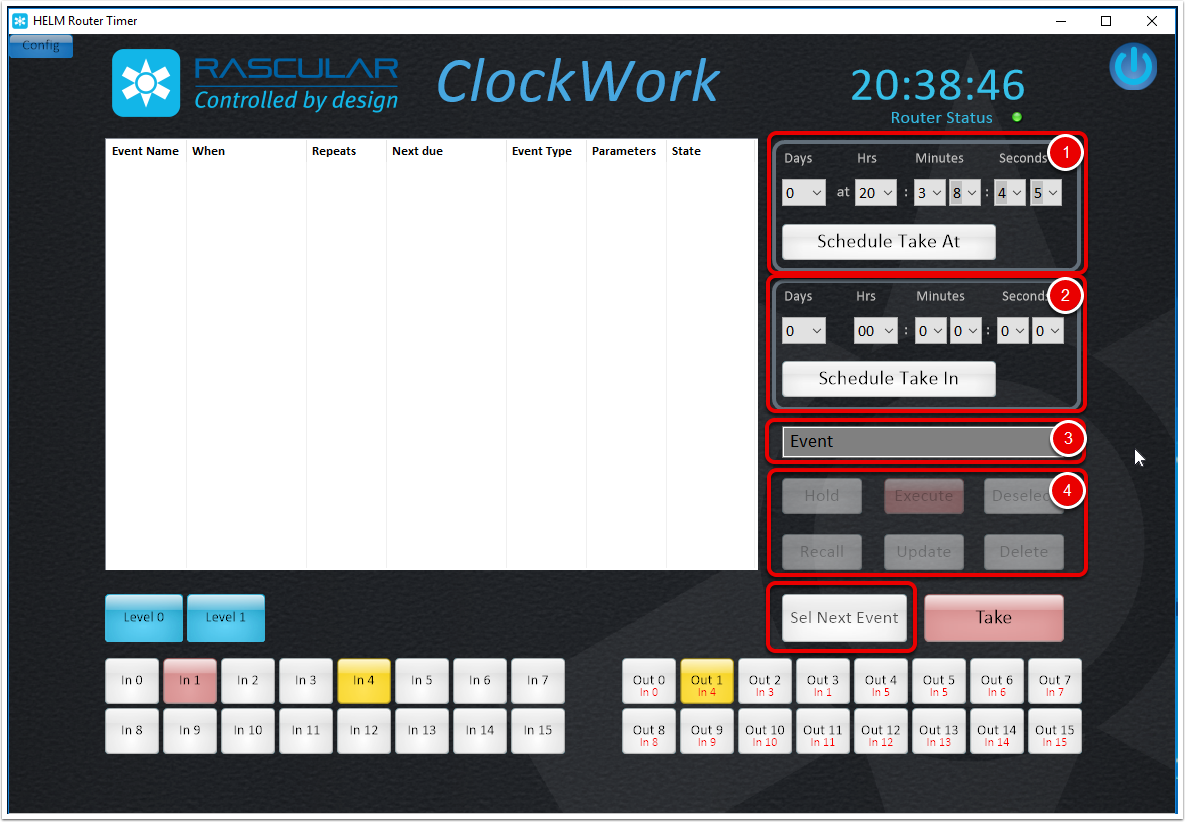
Here are the important areas of the ClockWork screen:
- X-Y router control panel. Here at the bottom of the screen is a classic X-Y router panel. It works in Arm and Take mode so first you select the output to control, enable the levels you require. The input bus displays the current routing of the selected output. You pre-select the new source and click the Take button to make the route.
- Schedule. This displays the schedule of router take events, when they are due, their status and what each event is.
- Event control. Here you can add events to the schedule, edit existing events, and intervene if needed in the execution of scheduled events.
and finally,
4. Config. Clicking the Config button puts the panel in configuration mode. So let’s do that right and set up the panel to control your router.

Configuration
ClockWork configuration is very simple – we need to set up just 3 things:
- Router Type. Simply select the make and model of the router from the dropdown menu.
- Router Size. Set the number of sources, destinations and levels.
- Connection. Set the IP address and the port for your router.
Click Save Settings when you have finished and the configuration will be stored and reloaded each time the panel is run.
Then click the Config button to return to normal panel operation. The Router Status light(4) shows that the panel and the router are communicating.

Manual switching
ClockWork can of course act as a normal manual X-Y panel:
- Source (input) selector: the source currently routed to the destination is highlighted in yellow, and when you click on another source to preset it for the next take it becomes light red.
- Destination (output) selector: Here you select the router destination.
- Level selector. these buttons allow you to enable and disable individual router levels for the coming take.
- Take button: executes the currently preset take. i.e. the armed input is connected to the selected output on the selected levels.

Scheduled switching
Scheduled events are created, edited and managed by the controls located on the right-hand side of the panel:
- Schedule Take At: schedules the currently preset router take to occur at a specific time.
- Schedule Take In: schedules the currently preset router take to occur after a specific time interval.
- Event Name: it’s useful to give events names relating to their purpose so that you can easily find them in the schedule.
- Event Control: these buttons allow you take actions with the currently selected even in the schedule.
You’ll notice that the Schedule Take At time keeps updating as time passes. Since it doesn’t make any sense to schedule an event in the past the schedule time is always at least the present moment.
So now let’s try adding some events to the schedule…
Event schedule
Now we have 3 events in the schedule:
Take Zero: set to run at 11:35:00 pm today
Take Four: set to run at 11:36:00 pm today
Take Five: about to run in 20s from now
All 3 events have the status Pending and the event that is about to happen has changed the Select Next Event button to red colour and shows the time to go. This let’s you quickly hit that button to select the event and intervene if you need to.
Once an event is selected in the schedule you can use the Event Controls to manage that event:
Hold – puts the selected event on hold i.e. it does not execute
Execute – immediately executes the selected event
Deselect – deselects the event
Recall – retrieves the events schedule data and router take action to the panel so you can make changes.
Update – saves your changes back to the selected event.

Repeated events etc.
ClockWork uses the Helm Clockwork component for task scheduling. And all the normal features of Helm Clockwork Manager are available. By right-clicking on an event in the schedule window you can set events to repeat daily or on specific days of the week. You can also save and load schedule files. More details of Helm Clockwork functionality can be found on support.rascular.com.

Troubleshooting
If your router is not responding i.e. Router Status red, the following steps will help isolate the problem:
– recheck configuration details (IP address and port)
– attempt to ping the router IP address from the Windows command prompt.
– If ping does not get a response from the router the check:
– network connectivity between the ClockWork PC and the router
– router controller status