Contents
The Preferences dialog allows control of various options that affect all Mediant windows and sessions.
Network Setup

The Imagestore Subnet only affects the Network Scan tool discussed on page12. The first three parts of the Imagestore IP address should be entered.
Ping Timeout determines how long Mediant will wait for a Ping reply from a device. This is used for Network Scanning, and for determining device status in the Device Manager window.
On networks which are configured to block ICMP Ping packets, you can disable the Ping checking. This can be useful to communicate with remote Imagestores in some cases.
Connect Timeout determines how long Mediant will wait to establish a TCP/IP connection with a device. For LAN-based units, a timeout of one second is usually adequate.
The Read Timeout is normally the longest timeout, and determines how long Mediant will wait for data from an Imagestore. If your Imagestores have very large numbers of images, then there may be a significant pause between requesting a directory from the Imagestore and the data being received. In these cases, a Read Timeout of 20 seconds or more may be needed.
The High Reliability and Bandwidth Limit options can be used to improve the reliability of the Imagestore’s network transfer system, which can be prone to unexplained failure when transferring large animation files. This problem also occurs with other media transfer tools such as the Miranda MDS software.
High Reliability makes a small adjustment to the configuration of the Imagestore network handler. This adjustment is volatile, and is automatically cleared if the Imagestore is restarted.
Bandwidth Limit restricts the data transfer rate to and from the Imagestore to the specified speed. Unimpeded transfer rates are typically up to 450 Kilobytes per second, but reducing this figure to 300K can lead to a significant reduction in failed transfers. If you are experiencing failed transfers, you should experiment with lowering this value.
You can also use the bandwidth limit to set a “bandwidth budget” for Mediant, preventing it from taking excessive network bandwidth to a device and thus preventing other applications from accessing the network reliably.
Image Thumbnails

Thumbnail Size controls the size of image thumbnails displayed. It also determines the size of thumbnails that are built. Larger thumbnails are typically slower but give higher quality. Changing these values will affect the display of all thumbnails, but the existing thumbnail files will not be rebuilt – they are simply scaled to the correct size.
The Cache Folder specifies the directory where thumbnail files are to be stored. In networked installations, it’s sensible to locate this on a shared disk, so that multiple Mediant users will use the same set of thumbnails. In this scenario, we recommend that all users have the same Thumbnail size set. This is not essential, but guarantees consistent image quality for all users. Click on the Folder button to choose a different folder, or enter the path directly.
If required Automatic Thumbnailing can be disabled for faster system performance.
Device Hierarchy

Lock Device Hierarchy is used to prevent changes to the defined hierarchy of Imagestore devices. This prevents accidental dragging of devices, and also disables the addition and deletion of devices in the hierarchy.
Imagestore Control

Synchronize Clocks will automatically reset the Imagestore ‘time-of-day’ clock to the Mediant PC’s time when Mediant starts. This is very useful to ensure that files created on Imagestore bear sensible time and date stamps. If you distribute LTC or VITC timecode to your Imagestore IS2s, you typically do not need to enable this option.
Commander-IS Location is used to tell Mediant the location of the Commander-IS program, if this is installed on your system. If this is set incorrectly, then Mediant will not enable integration with Commander-IS.
System Health Alarms can be set for low or high voltages and temperatures inside the Imagestore system. For Imagestore 750 devices, you can also check for fan speeds and dual power supply failures. Missing video signal s on the A, B and reference inputs can also be checked.
Image Conversion

Use Key to crop images ensures that images with keys are cropped to the optimal size before conversion to Imagestore formats. This affects all file formats which include alpha channels, especially TGA and 32-bit BMP.
Write empty key data. This should be selected if you are converting graphics without keys for Imagestore IS1 units. IS2 software supports a key type of ‘no key’, while IS1 requires empty key data to be appended to files, thus doubling transfer times and storage requirements.
Limit Image Width. This allows a maximum image width to be used when converting image files to .OXT. This is required for some early versions of Imagestore IS2 software which will not load images wider than 720 pixels.
When transferring OXT files from device to device, no conversions are performed.
SNMP Proxy

Mediant incorporates a simple SNMP proxy agent which will generate SNMP traps when Imagestores develop faults or go off-line. From the SNMP page, you can enable these traps, and specify the SNMP management host to receive these traps. A Management Information Base (MIB) file containing details of the traps generated is included with the application.
Mediant can automatically resend trap messages at regular intervals while the device is in the error condition, to guard against trap messages being missed by the receiving system.
Logging
Mediant keeps log files that list any errors detected by the syste, as well as logs of certain operations.
These are held in the current users “application data” folder whose location is operating-system dependent.
On Windows Vista, for example they are held in C:\Users\<username>\AppData\Roaming\Rascular\mediant\Logs
Mediant will purge old logfiles after a certain number of days. You can specify this in the Logging preferences tab. Old logfiles are only erased when Mediant starts up, and Mediant generates a single logfile every time it is run.

Scheduled Operations
Mediant can be configured to automatically delete media files after a specified date. To do this, Delete Expired Files must be enabled, and a check interval specified.

The expiry dates for files are set by right clicking on them in the browser and choosing Set Expiry Date.
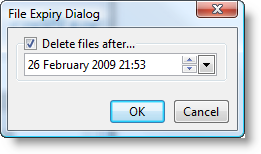
You can specify the date and time when they should be removed. Files with an expiry date appear with an indicator icon (calendar/trashcan) when viewed as thumbnails. The actual expiry date is shown in the Details view.