Contents
One of the simplest ways to set up VISUAL CONTROLS is the PROPERTY-LINK feature. When all you want is to have a button switch something on and off this is the way to go. You can of course achieve the same result using EVENT SCRIPTS but PROPERTY-LINKS are far simpler.
Setting up a Property Link

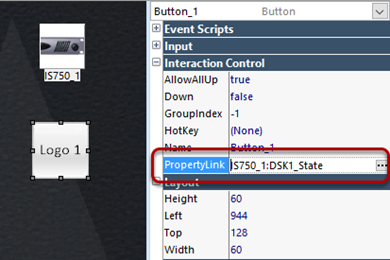
Here we’ll use the ‘Logo 1’ button to control the DSK1 state of the IS750. To do this we select the button and then click on the ellipsis (…) at the right of the Property Link box.
Choose the device property to link

The Select Property dialog opens showing all devices and all properties. We go to the IS750 and click the + icon to expand its property list. Find the DSK1_State property and click it.
‘Logo 1’ now drives the DSK1 state
Now when you run the panel the ‘Logo 1’ button will light according to the state of DSK1. And when you press the button it will change the DSK1 state. Note that the status is shown correctly even if the DSK state is changed from outside of Helm.
Read-only properties

Some properties can be driven by VISUAL CONTROLS; others are only for status indications. When you need to access these properties, check the Show Read-Only properties box to reveal them. Here for example we select Error Status for a panel indication.
Continuous vs. Discrete properties

Perhaps it’s stating the obvious but device properties can be Boolean e.g. on-off, or they can be numbers e.g. audio gain, or they can be text. Here’s a FADER control linked to the IS750 Audio Output Gain.
Clearly you have to be sensible about what you link to what. For example, linking a FADER control to a text property won’t get us very far. Helm will do its best but the results will not necessarily please.
Great panels without scripting
The ability to extensively link properties in this way lets you create panels with analog and digital indicators as well as controls that directly drive device properties without the need for even one line of script. And that’s only the beginning of what you do with Helm.