Contents
Before starting to use Helm, it’s useful to understand some of the key terms and concepts used by the system.
Devices

A Device is an external piece of equipment for example, an Imagestore, or router. All devices controlled by your panel will appear as icons on the panel while you design it, but are invisible at run time. Devices are placed on the panel from the Parts Bin. Most devices can trigger EVENT SCRIPTS.
Visual Controls

A Visual Control is a component of the Graphical User Interface of the panel. Buttons, labels and Images are all examples of Visual Controls. Like DEVICES, Visual Controls are dragged onto the panel from the Parts Bin.
Properties

Every DEVICE and VISUAL CONTROL has a range of Properties. These affect the visual appearance of the control, or operation of the device. Properties can be set at design time using the Property Inspector, and can also be read and modified from EVENT SCRIPTS
Property Links

VISUAL CONTROLS can be linked directly to DEVICE properties. The linkage is two-way i.e. linking a Button to a keyer causes the keyer state to change when the button is pressed, and the button to light up when the keyer is active.
Event Scripts
Each type of DEVICE and VISUAL CONTROL can generate a number of events.
![]()
For a branding DEVICE, these would include ones like “Fade To Black (FTB) is ON”, or “FTB is off OFF”.
![]()
For a VISUAL CONTROL button, its events would typically be “PRESSED” and “RELEASED”.
A script is associated with each event. This is a list of ACTIONS to perform when an ITEM generates a certain event. EVENT SCRIPTS allow a VISUAL CONTROL to perform a sequence of actions.

Actions
An Action is an instruction to a device or control to perform a particular function. For a branding device, these include things like “Load Logo N”, “Turn keyer on”, “Turn keyer off”, etc.
VISUAL CONTROLS can also perform actions like “Turn Light on/off”. Some actions take PARAMETERS, for example a logo name or number.
These parameters must be written in to the list of Actions to be performed on a specific EVENT. The Script Editor dialog has tools to help you enter parameters when required.
Parameters
A Parameter is a value used by an ACTION to specify the exact details of what to do. For example, when we use an ACTION to instruct a branding DEVICE to load a logo, the parameters required are the name of the logo and the keyer layer on which to load it. The Helm script editor displays the parameters required for each action, and provides a simple way of specifying them.
Script-Accessible Properties
As well as using fixed values for PARAMETERS (like “fred.jpg”, or “42”), you can also use SCRIPT-ACCESSIBLE PROPERTIES of DEVICES as PARAMETERS. As an example, imagine you want to allow the operator to select a logo by typing the logo name into a Text Edit control, and then pressing a button to perform the load. Your script can retrieve whatever the operator has typed by using the “Text” property of the text Edit control and using this as the logoname parameter.
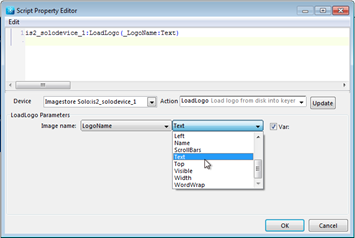
SCRIPT-ACCESSIBLE PROPERTIES can be added by clicking the “Var” checkbox. A pair of drop-downs appears that allow you to select the Item and the Property value to be used.
As an example, to load the logo specified in the Text Edit control called LogoName onto the logo layer of an Imagestore called IS2_solodevice_1, our action would be:
is2_solodevice_1:LoadLogo(_LogoName:Text)
You can also enter this code manually in the editor window. But if you do so you must remember that the leading underscore is vital – this indicates that what follows is a SCRIPT-ACCESSIBLE PROPERTY reference.
Ordinary PROPERTIES cannot be used within scripts. Only those specifically listed as SCRIPT-ACCESSIBLE can be used in this way.