Helm Clockwork Sequencer is an engine designed to run sequences of events that have a given duration. For example you might want a sequence that makes a router switch, brings up a caption for a set time, then makes another router switch. Sequencer lets you automate this and run the sequence at the press of a button. The key difference from Helm Clockwork is that Sequencer events have durations and can trigger multiple actions during the course of a single event. Sequencer events are played one after another until the schedule finishes.
Here is a brief guide on how to set up and use Helm Clockwork Sequencer.
Defining events

The Sequencer schedule is built up from pre-defined events which you define during panel design. To add event types click the ellipsis to the right of the EventTypes property.
Adding an Event Type

Click on the Add button.
Edit the Event Name and choose a colour for it

First off we need to name the Event Type 1) and optionally we can choose fill colour and text colour as it will appear in the Helm Clockwork Manager list window.
Events can have up to four parameters

These parameters can be entered in the Clockwork Manager window at runtime by the operator to modify the behaviour of the event . For example a parameter could be a DSK number or a fade duration.
Clockwork Sequencer event scripts

Each Sequencer event has up to four scripts associated with it. So four separate actions can be triggered by an event. Each script can be set to occur a particular number of second before or after the event start or finish. So a typical sequence might be:
Script 1 – a pre-event script that sets up devices prior to the event, for example to load a graphic,
Script 2 – take the graphic to air
Script 3 – trigger a DVE move
Script 4 – fade out the graphic
The duration of the event is set at runtime in the Clockwork Manager window, so the overall duration can be timed to match program material.
Setting up an event script

Here we have set up script 1 do perform a router switch 1 second before event start (1). To define the actions needed we click the Edit Script button (2) and create a script in the normal Helm way. You can use HelmScript or Lua in Clockwork Sequencer scripts.
Using event parameters in scripts

Just taking things to the next level for a moment. Here we’ve made the router input variable and linked it to EventParam1. So now the router input can be set at runtime by the operator.
Defining a default schedule

Although the schedule can be created and edited by the operator at runtime, it is sometimes useful to be able to create a default schedule that is loaded when the panel is run. Here’s how we do that.
With the Clockwork Sequencer selected we click on the ellipsis (…) to the right of the Schedule property.
the Schedule Editor window opens

Now click the Add button (shown by the arrow) to add an event to the schedule.
Setting up a schedule event

When an event is selected in the schedule editor, the Properties window displays the properties of that event. So you simply type in the Event Type, Name, Duration and any parameters needed.
Modifying the schedule

The top row of buttons in the schedule editor let you Add, Delete or move the selected event in the list. And the event properties can be modified in the Property window.
Setting a schedule file as the default schedule

If you have already saved a Clockwork Events file created during runtime, you can set this as the default schedule for the panel. Simply select Helm Clockwork Sequencer and go to the ScheduleFile property. When you click the ellipsis (…) on the right a file selector dialog opens and the file you choose gets loaded each time the panel runs. Clockwork Events files are in fact xml files so you can even create schedules from other systems.
Now for a live demo

To show Sequencer in action we’ve created two events that perform router switching on outputs 0 and 1 of a dummy router. You can download this demo panel here. In the next section we will show the runtime features of Sequencer. How the operator can use it to set up sequences of timed events
How to add an event to the sequence

To add an event right-click in the Clockwork Manager window and select AddEvent and choose the event type – in this case SwitchOutput_1.
Set up the event

Name the event (1) – this is optional, and set the event duration (2).
Event is now in the list

Let’s add another event
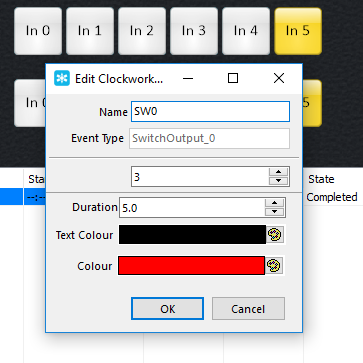
This time the event has a parameter (router input value) that we have set to 3
Now we are ready to run the sequence

When we click the Running button Clockwork Sequencer runs the event sequence. The status of events is displayed in the Manager, and router busses start to show the switching actions. You can Pause the sequence or Stop it by clicking the buttons. These buttons are a RadioGroup linked to the Clockwork Sequencer state for the purposes of this demo. But of course you can trigger Helm Clockwork Sequencer from any Helm action including device status changes.
Let’s see that in action
Here’s a short video clip of the demo panel in action.
Saving a schedule for later

Right-click in the Clockwork Manager window gives the option to save a schedule as a Clockwork Events file. And of course you can also load previously saved schedules or append them to the current schedule. This way Clockwork Sequencer let’s you quickly set up complex operations for instant replay. So let’s save our file now as Test.ckxml .
And finally
Clockwork Sequencer provides a powerful tool to manage and automate highly complex sequences of operations.